Now that spring is here the back yard is full of birds, squirrels and the occasional rabbit. I was entertained this afternoon by a Ninja Black bird.I'm not sure of the actual species but it is black so in my book that makes it a Black bird. I see this scene played out a few times a week. I'm not sure what the rivalry is, but the birds do not like the squirrels. Enjoy.
Welcome to Ricks Shop. I have been out of the airgun hobby for a few years now but I'm leaving this blog up since it still gets a few questions and comments. I hope you find some useful information. Enjoy, Rick
Saturday, May 18, 2013
Bird vs Squirrel
Earlier this spring I had the pleasure of seeing a drunken squirrel in my back yard, it was funny as hell. The offending squirrel had found some fermented crab apples from last fall and much to my amusement stumbled around my back yard for a while but was gone by the time I got my camera out.
Now that spring is here the back yard is full of birds, squirrels and the occasional rabbit. I was entertained this afternoon by a Ninja Black bird.I'm not sure of the actual species but it is black so in my book that makes it a Black bird. I see this scene played out a few times a week. I'm not sure what the rivalry is, but the birds do not like the squirrels. Enjoy.
Now that spring is here the back yard is full of birds, squirrels and the occasional rabbit. I was entertained this afternoon by a Ninja Black bird.I'm not sure of the actual species but it is black so in my book that makes it a Black bird. I see this scene played out a few times a week. I'm not sure what the rivalry is, but the birds do not like the squirrels. Enjoy.
Monday, May 13, 2013
Benjamin Discovery accuracy improvement #1
While my Disco accuracy has been OK I know there is better accuracy to be had. I have been getting consistent dime sized groups at 30 feet. Having done some work to the trigger and lightening the pull it is much easier to stay on target while shooting.
I had removed the front sight while I was doing the trigger work with the intention of removing the barrel band so I would have a floating barrel. I never got around to removing the barrel band and shot a bench rest target without the front sight installed. The target was better than expected, with every pellet touching the 1/4" bulls eye and most of them well inside the black.


I had removed the front sight while I was doing the trigger work with the intention of removing the barrel band so I would have a floating barrel. I never got around to removing the barrel band and shot a bench rest target without the front sight installed. The target was better than expected, with every pellet touching the 1/4" bulls eye and most of them well inside the black.

I had a feeling this wasn't totally due to the improved trigger pull, and since the only change I had made was removing the front sight I decided to re install the front sight and see how it shot. With the sight re installed I could still hit the bull most of the time but nowhere near as consistent as without it installed.

To verify the front sight was causing the accuracy issues, I removed the front sight again and shot a third target. The accuracy returned. I looked at the sight and there is no chance the pellets were clipping the sight as they exited the barrel, a closer inspection of the tube showed signs that the sight was touching tube when it was installed. There is a slight wear mark in the blueing on the tube where the sight was rubbing.

For my next accuracy test I am going to play around with the barrel band.....
Benjamin Discovery trigger
I did some research online about improving the Discos trigger. There is plenty out there, the 3 screw mod, a replacement sear that is adjustable and the usual polish up the contact points. My first Disco arrived without the safety button. The trigger on it was much lighter than the replacement Discos trigger. During my online search I figured out why the trigger was lighter on the first Disco, the spring that acts as a detent for the safety is the same spring that holds the sear engaged. Without the safety in place the sear spring has less tension on it giving the trigger a lighter pull. I opened up the trigger with the this fact in mind.
To get to the inner workings of the trigger the action must be removed from the stock. The first step is to remove the safety. The safety slides out after the spring is pulled away from it. I used an O-ring pick (AKA finger stabber) to reach into the slot and pry the spring forward. Once the safety is removed simply remove the one screw that attaches the stock to the action and separate the action from the stock.


The trigger is pretty simple and easy to work on. The intermediate sear and sear are the usual, stamped out of metal and pretty rough. I smoothed out all the contact points with a diamond hone and polished them with an Arkansas stone. I lubed the trigger with my special grease, a Moly bearing grease that I added graphite to. This polishing and lube will get rid of the gritty feel, now to lighten the pull.


To get to the inner workings of the trigger the action must be removed from the stock. The first step is to remove the safety. The safety slides out after the spring is pulled away from it. I used an O-ring pick (AKA finger stabber) to reach into the slot and pry the spring forward. Once the safety is removed simply remove the one screw that attaches the stock to the action and separate the action from the stock.

I was a bit disappointed to find the trigger housing and blade are plastic. Two screws hold the cover on.

The trigger is pretty simple and easy to work on. The intermediate sear and sear are the usual, stamped out of metal and pretty rough. I smoothed out all the contact points with a diamond hone and polished them with an Arkansas stone. I lubed the trigger with my special grease, a Moly bearing grease that I added graphite to. This polishing and lube will get rid of the gritty feel, now to lighten the pull.

This is the sear/safety spring after I put a little kink in it. I wanted less tension on the sear but still have enough pressure on the safety for it to function. It worked the first time. My highly calibrated eye was right on the money today.

There is a trigger return spring that I also replaced, the original is on the left. I searched through my hardware store spring collection until I found one with an OD close to the original but with lighter wire. It is a little longer but is still lighter than the original spring.

The trigger housing has the bosses molded into it for trigger adjustment screws, all that is needed is a tap and the correct length screws and you are 2/3 of the way through a 3 screw mod. I didn't try this yet as the changes I made gave me a trigger pull that I am happy with.

I had to disable comments for this post, the spammers really like this post for some reason......
Saturday, May 11, 2013
Benjamin Discovery on CO2
While shooting the Disco on HPA I was encouraged to see that it grouped well even as the pressure dropped down to around 1000 psi. I degassed the Disco today and filled it up with CO2 to see if it would shoot as well as I was hoping.
I set up the Chrony and got out a tin of RWS Meisterkugeln 8.2 grain pellets. I was shooting in my basement again, from a bench with the target at 30 feet. It stays around 65 degrees in my basement, not the optimum shooting temp for CO2 but at least it is consistent. The gauge on the rifle showed a pressure of about 800-850 psi. The pressure stayed consistent through almost 60 shots.
I was firing a shot every 15 to 20 seconds, with about a minute break every 10 shots to look at the pressure gauge and write down velocities for each 10 shot string. I mention this because I noticed a drop of about 15 fps on the first shot of each string, then the fps would rise back up and stay fairly even for the next 9 shots. I was expecting the opposite to happen as the rifle had time to warm back up during the break between shot strings.
The shots stabilized after shot #10 at around 690 fps velocity slowly dropped to 670 fps at shot #50.

The change in fps didn't seem to affect the POI. In fact the POI remained damn consistent for all 70 shots. I love CO2! The middle target has over 40 shots into a group the size of a dime, in fact looking at the targets all 70 shots would be covered with a dime. Not bad, and I hope to shrink the groups with a few mods to this rifle.

With the lower fps on CO2 I wouldn't do any shooting beyond about 25 yards but with 3X the number of shots per fill, CO2 is perfect for target shooting and plinking.
It took about 10 shots after filling for the fps to even out, the drop in fps is linear on CO2 unlike HPA. On HPA the fps initially climbs, levels off then starts to fall as the fill is depleted.
Friday, May 10, 2013
Benjamin Discovery Chrony test
The first shots start at 940 fps climb to 960 fps before dropping back to 940 fps at shot #26

Looking at the targets I shot it tells a different story, the deviation in fps from shot 1 to shot 30 didn't have much effect on the shot groups. All three 10 shot groups can be covered with a dime and the POI didn't move.

I was focused on the chrony numbers and didn't think about the POI not moving until the next day. I set up another target and shot 10 shot groups until the POI started to drop. I got 17 more shots before the POI started moving down. That gives me 47 shots inside a dime at 10 yards.

This air gun seems to shoot well at 900 psi and that is encouraging for CO2. I'll have to check it out on CO2 this weekend.
Wednesday, May 8, 2013
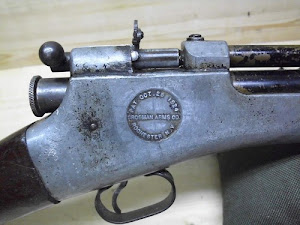
The replacement Discovery has arrived!
It has been a month since my first PCP purchase, a Benjamin Discovery. Three days after its arrival it developed an air leak. I sent it back to Crosman with a list of my concerns.... Lack of accuracy, pellets didn't feed well into the barrel and of course the air leaking out the barrel. It took a bit longer than expected but my replacement arrived today.

I am much happier with this rifle. It seems to want to group well. I've only got about 60 pellets through it but it is shooting much better than the first one. I couldn't help my self, I unboxed it pumped it up and fired 23 pellets through it trying five different pellets, 5 shot groups at 10 yards from a rest. I fired 3 shots first with the iron sights to make sure all was well, then mounted a scope to try out some pellets. It doesn't appear to be pellet sensitive POI didn't change much from pellet to pellet. RWS Meisterkugelns 8.2 grain were the winner with five shots going into a nice little clover leaf. Those 23 shots dropped the pressure from 2000psi down to just a bit over 1000psi, so it looks like I can expect about 25 good shots per fill.


I am much happier with this rifle. It seems to want to group well. I've only got about 60 pellets through it but it is shooting much better than the first one. I couldn't help my self, I unboxed it pumped it up and fired 23 pellets through it trying five different pellets, 5 shot groups at 10 yards from a rest. I fired 3 shots first with the iron sights to make sure all was well, then mounted a scope to try out some pellets. It doesn't appear to be pellet sensitive POI didn't change much from pellet to pellet. RWS Meisterkugelns 8.2 grain were the winner with five shots going into a nice little clover leaf. Those 23 shots dropped the pressure from 2000psi down to just a bit over 1000psi, so it looks like I can expect about 25 good shots per fill.

After the initial fill and shots I thought I had better do the right thing, the thing I should have done first.... Clean the barrel....
It took 13 patches, I pulled each one through then flipped it and pulled it through a second time for a total of 26 patches through the bore. I put a few drops of Marvel mystery oil on three of the patches followed by two dry patches. The oiled patches seemed to really help loosen up the crud. The last one wasn't perfectly clean but I was tired of pulling patches through the bore.

With the bore clean I pumped it back up to 2000psi and after 10 shots to foul the bore I shot this 10 shot group with the RWS Meister Ks. Things are looking good!

I'm curious to see how the Disco shoots on CO2, as the first one didn't do well at all. I think I'll spend some more time shooting on HPA before I switch over, I want to get some Chrony tests and more trigger time before I change things up.
A few observations, the loading port is far from generous... there is barely enough room to fit a pellet in front of the bolt. Once the scope was installed it got even tighter, but after loading it a few times it gets easier.

The trigger seems a bit heavier on this gun and if it doesn't get any better with use I will have to see what can be done to lighten it up. Prior to getting the Disco I built a prototype silencer that seemed to work pretty well. Building one for the Disco is on the short list as it is a bit loud, it is not nearly as loud as I was expecting but being quieter would be better.
Tuesday, May 7, 2013
Daisy 201 " Part 2 "
Boring out the compression tube went well. The seal measures out to be .75 inches, I bored the tube to .745" then polished the machining marks out. A good clean up and now the piston pushes air.


I left the new cylinder a little long.

I was hoping that the friction of the seal inside the tube would be enough to retract the transfer port from the barrel and allow the barrel to be opened for loading pellets, that didn't happen. I have a plan for that....

After a few shots to make sure everything was functioning I shot ten pellets at 15 feet. They hit low and left but at least it has enough power to break through paper and the cardboard backer. The group is 3 1/2"
6 of the shots went into a group of 1 1/2".

Since it now has enough power to shoot its way out of a wet paper bag I'll continue on with replacing the smooth bore barrel with a rifled barrel.
Sunday, May 5, 2013
Powerline 201 by Daisy
I bought this pistol a couple years ago thinking I wanted to try shooting a pistol and for under $20 I had an idea of what I was getting.
I have had a few pistols over the years, most of them bought at auctions or estate sales because they were "too good of a deal to pass up" I never kept any of them very long. There is just something about a pistol that attracts me to it, I have never taken the time to get good at shooting a pistol but have always liked them.
I didn't shoot this pistol much after I bought it, just enough to know that I got what I paid for, a sub $20 air gun. It has been sitting collecting dust along with a couple CO2 pistols bought a little more recently.
I had read about someone modding this kind of pistol by replacing the smooth bore barrel with a rifled barrel and thought since I had a Daisy "soda straw" barrel in my parts stash I would give it a try. I wanted to get a baseline to compare to after the mod. At 16 feet the pellet hit the floor just in front of the pellet trap. So much for getting a base line....
I went ahead and opened it up to see if there was anything that could be done to get it to shoot.


I had some time this afternoon so I got started on the compression tube. I'll finish boring the hole on another day. I have two concerns during the next operation, the tube collapsing while i'm boring it out and getting a good finish on the bore so the piston will seal and not get chewed up....


I have had a few pistols over the years, most of them bought at auctions or estate sales because they were "too good of a deal to pass up" I never kept any of them very long. There is just something about a pistol that attracts me to it, I have never taken the time to get good at shooting a pistol but have always liked them.
I didn't shoot this pistol much after I bought it, just enough to know that I got what I paid for, a sub $20 air gun. It has been sitting collecting dust along with a couple CO2 pistols bought a little more recently.
I had read about someone modding this kind of pistol by replacing the smooth bore barrel with a rifled barrel and thought since I had a Daisy "soda straw" barrel in my parts stash I would give it a try. I wanted to get a baseline to compare to after the mod. At 16 feet the pellet hit the floor just in front of the pellet trap. So much for getting a base line....
I went ahead and opened it up to see if there was anything that could be done to get it to shoot.
This pistol appears to be a copy of the Marksman 1010. It is capable of shooting pellets or BBs.

I started my disassembly at the muzzle, removing the pin that the barrel pivots on.

Then the barrel came off.

The transfer port is visible here.


There is a clip in the end of the slide that attaches the slide to the piston assembly.


The main spring has a bit of preload on it and the compression tube (on the right) popped out when I split the halves. I reassembled it for this pic. There is also a small spring under the latch that locks the slide that wanted to shoot across the room when I opened it up.

The square piece below the trigger springs in the grip area along with the grips are made of metal and I assume they are meant to add weight to the pistol.

The piston seal is not meant to be serviceable, the open end of the compression tube is crimped around the piston after it is inserted. The reason for this is the transfer port nipple slides into the barrel locking it closed and sealing the transfer port to the barrel. When you cock the pistol the piston hits the crimped end of the compression tube and pulls the transfer port out of the barrel allowing you to open the barrel to load a pellet. The seal was a bad fit in the compression tube, I couldn't feel any resistance and the piston didn't move any air when I moved it. I removed the piston from the compression tube in a very professional manner.... Pulling hard... the seal didn't get damaged during my brute force removal.
My plan is to build a new compression tube on my lathe, with a better fit for the seal.

The transfer port is shaped and bored at .098" it's a few thousands larger than the transfer port on the original

I turned down the OD to match the original

The next step is to cut it to length and bore it out for a good fit on the seal. A project for another day....
Subscribe to:
Posts (Atom)