Saturday, December 28, 2013

CBG Amplifier

When I first started this Cigar Box Guitar hobby, I had a feeling it would turn into an obsession... I was correct.
It is similar to my air gun obsession, in that there are many levels. Why just shoot air guns when you can tune and mod them. Why just play a CBG when you can build them?
Besides building guitars there are Amplifiers to build, I have a background in electronics so this part of the hobby is going to require less work than trying to relearn how to play a guitar.

I purchased an amplifier kit that is based on the LM386 OP amp. It is a bare bones kit without any switches or a speaker.
The kit came with a schematic and some notes about options for the amplifier circuit.

I had a cigar box that wasn't going to work for a guitar but would make a great housing for my amp.

A $1 pawn shop speaker should work for this amp.

I dug out my 1980s vintage soldering iron, solder and flux. 

Let the soldering begin....

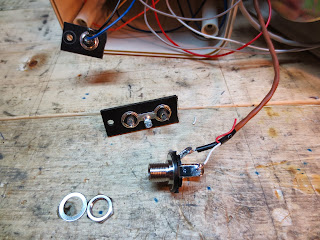
I decided to wire the 1/4" jack and speaker directly to the board instead of using the supplied jacks. 

I added a remote pot for the volume control instead of the miniature board mounted pot that came with the kit. I also added a switch to turn the power off and on.  

A plate was added to the box to hold the input jack and volume control. I didn't want to ruin the logo on the front of the box so I cut a hole in the back for the speaker and I mounted the power switch on the side.


With everything mounted, (except the battery) I took the amp for a test drive. 

It wont make your ears bleed, but I was surprised how much sound it puts out. With the Licence plate guitar and its piezo pick ups it puts out a nice clean sound. When I plugged in my Peavey electric guitar it put out plenty of volume and had some nice crunchy distortion.
I'm pleasantly surprised with how this amp turned out and the amount of sound that an amp powered by a 9 volt battery will put out.


Wednesday, December 25, 2013

CBG build #2 Acoustic this time?

I've started my second CBG, I will be using a cigar box for this build. It will be a three string this time and I'm thinking acoustic.... maybe... it will depend on how it sounds.

I wasn't sure that the fret  template I printed out for my first build had printed out to scale. I decided to lay this one out by measuring each fret position. When I checked the layout against the printed version they matched. I wasn't too worried about getting it perfect, after all it is just a box, a stick and some string. 
I used poplar for the neck this time and oak for the finger board.

The box I used had some extra panels in it. I glued them to the inside to keep them from rattling. They help align the top when it's closed and make the box a bit more sturdy. 

With the notches cut for the neck it was time for a test fit. 

I modified a picture hanger hook for the string anchor.

These copper cut nails will keep the strings from cutting into the neck. 

Three more nails to complete the tailpiece. 

The tuner install was trouble free this time. I found a piece of 1/4" thick brass that I used for a nut. 

A couple 1" holes to let the sound out and this one is making music.

This one will stay acoustic for now.... 

For the next one I'm going to wind my own pick up, I also have an amp kit to assemble so stay tuned. 


Tuesday, December 24, 2013

Sunday, December 22, 2013

CBG build, part 3 It's Electrifying! Adding a pick-up.


My licence plate guitar does produce sound but doesn't have much volume when played as an acoustic. The licence plate guitar wasn't meant to be acoustic and since I went with a through the body neck there isn't room for a magnetic pick-up without making major modifications. When I started this build I had planned to add a piezo pick up and had ordered a kit that included a volume control, 1/4" jack, 2 piezo pick ups and wire. 

I laid out the holes for the jack and volume control so they would clear the blocks inside the body.

The piezo kit came with a wiring diagram that is easy to follow. I have a soldering iron and all the other stuff needed to put this kit together. 
I glued the piezo to a wood block so I could mount it in different locations if needed.
I tried mounting it on the neck forward of the bridge. 

The piezo works, tapping on the pick up can be heard through the amp. However it's not picking up the sound from the strings. I have a feeling the licence plate isn't transferring the string vibrations into the neck or body since it is only attached with four screws.  


I tried removing the wood block from the piezo and attached the piezo to the licence plate instead of the neck, not much improvement. Then I added the second piezo and attached it to the licence plate also, still no joy. I have to crank the amp way up to hear anything. Then I got out my distortion pedal and hooked it up, that made all the difference. The piezos just needed a bit of a boost.  I still need to do some tweaking as I'm getting a lot of noise transmitted through the body and neck. The piezo discs are more sensitive to the mechanical vibrations transmitted through the wood and metal by touching it than the vibrations of the strings. I have read of builders liking the piezo rods that are mounted in the bridge, I may have to try that in a future build. Before I do that I want to wind my own magnetic pick up.....

Then I got a little side tracked .....
Santa is bringing me a 9 volt amp kit  for Christmas and I just need a speaker, since it isn't included in the kit. A trip to a pawn shop and I found a couple candidates to donate their parts, a computer speaker and a small Sony speaker.
At $1 each, even if they aren't what I need I'm not out much.

Once I got them home and looked a little closer I realized the Reveal speaker also has an amp in it.  

It is a stereo amp with left and right inputs and an out put for the other missing speaker. It needs a 12 volt DC power supply. I had picked up a Universal power supply last week so I have that covered. I plugged it in and the power light came on, I could hear a bit of  static when I turned the volume control.... a good sign! 

I opened it up to do some detective work, with the power on and the volume cranked up I touched the input wires and could hear static when I touched the white wire. The white wire is the one I want to hook my 1/4" jack to. The red wire is the input for the other channel (the missing speaker) 

A quick snip and then solder the wires to my new jack. 

The new jack fit in the existing holes. 

My new practice amp, it doesn't take up much space. 
The Sony speaker will be used in my amp kit 


Sunday, December 15, 2013

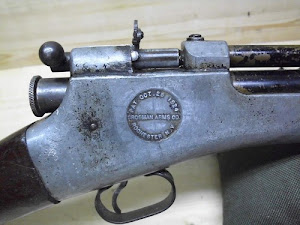
Crosman Heritage 2260

My latest air gun is a Crosman "Limited Edition" 2260. Crosman has the option of adding an engraving to the stock. I didn't have anything engraved, mostly because I couldn't think of anything I wanted engraved and also I think I got it faster as it didn't have to wait to be engraved. It took about three weeks for it to arrive, three looong weeks.
The stock appears to be the same stock used on the Discovery, minus the hole for the pressure gauge.
My Disco above and the 2260 below.


The breech is plastic with a brass bolt, and the rear sight can be changed from notch to peep.
I was a little disappointed with the unfinished look of the stock behind the breech. It is only cosmetic but it detracts from the looks, makes it look a bit like something thrown together from spare parts.

I fired a few Crosman Premier Hollow Points to get it sighted in then shot a 10 shot group with the iron sights.
Not bad for the first group and shot with the peep sight. The bulls eye is 1/2". I'm sure the groups will tighten up once I get a scope mounted and find the right pellet.


Along with a box of pellets I ordered the steel breech kit, with my tired eyes I need a scope and the best way to mount a scope is to install a steel breech.
 

The steel breech installs easily and only takes a few minutes. Crosman includes the Allen wrenches you need with the kit. A few things to keep in mind, the mounting screw under the bolt takes a small Allen wrench .050". Make sure it is seated all the way into the socket. It is very easy to strip the wrench, or worse strip the socket in the bolt. When you install the bolt handle into the bolt make sure it slides smoothly before you mount the breech. Mine didn't work smoothly so I unscrewed the handle spun the bolt around and screwed it in through the other side of the bolt and that smoothed things out. Before you crank the mount bolts down make sure the transfer ports in barrel and the breech are lined up and that the steel sleeve that goes between the breech and tube is seated in the barrel.  

Medium scope mounts got the scope at the right height for a good cheek weld and also gave me room for loading pellets. 

The 2260 doesn't seem to be to picky about what pellets you feed it, the 5 pellets I tried were all around dime sized groups at 10 yards (10 shots for each group) The RWS Super Domes were the best. The Beeman Bearcubs were another good performer, to bad they aren't available any more. 

The low shot on the Crosman Premier Field Target (cardboard box) was the end of the CO2 cart. I need to retest those pellets to see if a full cart. makes a difference.
I'm not sure how many shots I'm getting from a cartridge, I haven't taken the time to get a shot count. It is at least 30 shots and probably  more like 40. 

I'm very happy with my latest purchase and hope Crosman brings it back permanently and maybe brings back the 1760 also. Crosmans CO2 rifle line is pretty thin these days....
Honestly if this airgun had been available a few months ago I would have purchased it instead of the Discovery. Nothing against the Disco it's just that the 2260 suits my needs better than the disco.


Saturday, December 7, 2013

CBG Part 2

The CBG / Licence plate guitar build continues. 

  
I filed the ends of the frets even with the edge of the neck and rounded over the square corners on the back of the neck. I followed the directions that came with the tuners and drilled the holes for them. 

The dowels I used to pin the scarf joint were right where the tuners needed to go. Not a huge deal just another lesson learned. I figure by my third or fourth guitar I should have most of the big mistakes out of the way.

I cut a slot for the nut to fit in. Is it ironic that I'm using a bolt for the nut? Maybe not....
I had a 1/4" brass bolt in my parts stash, I cut it down to 1 1/2" to match the width of the neck.

I used a two part epoxy to glue the nut in place. I put painters tape around the nut to keep the excess epoxy from getting on the fingerboard and head.

A place I should have measured twice. When I drilled the holes for the tuners, the holes on the left (in the picture) ended up about 1/8" farther in than the ones on the right.


I used screws along with glue to attach the neck to the box. The hinge will serve as the tailpiece after I drill four holes for the strings to go through. The screws that fasten the hinge to the body also screw into the end of the neck. 

The licence plate attached

I cut the "legs" off a brass drawer pull to serve as the bridge. With the strings installed it now makes noise! I still need to make a back, maybe another licence plate. I have some 1/4" plywood and may end up using it for the back. 
The next installment will be adding the piezo pickup, volume control and jack.


I had ordered cigar boxes online and they arrived today. Of the five I received I can use three. The one in the back on the left and the one in front will become guitars and the one in the back on the right will become an amp. 

While I was out and about today I stopped in the Habitat for Humanity Restore and picked up a couple items I thought could be used on my CBG builds. The drawer pull on top is the one I used for the bridge on this build, the hinge on the left is the one I used as the tailpiece.