Saturday, August 31, 2013

Crosman AIR 17

The Crosman AIR 17 is a single stroke pneumatic made to shoot pellets or BBs. It was manufactured from 1985 to 1990. Being a single stroke it is pretty low velocity at 450 fps for BBs and 400 fps for pellets. The low velocity along with a smooth bore barrel make this air gun a plinker.
I first saw the Crosman AIR 17 in online auctions and thought it was an interesting air gun. Crosman didn't make many Single Stroke Pneumatic air rifles. It is a "replica" of the AR-15 / M-16 even though it is mostly plastic it's not a bad replica. I like the looks of it....


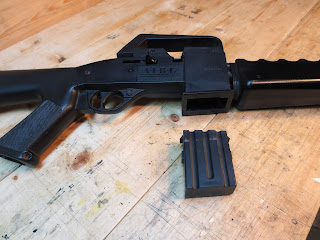
The magazine is detachable and can be used to store extra pellet clips. 

There is also a "secret" compartment in the stock. Fun stuff.... 

The pellet clip holds 4 pellets and also has a single shot tray built into it. The later style 5 shot pellet clips that fit the  Model 760 also fit this air gun.

The rear sight is a peep and the front sight is a post. 

I shot a few groups using pellets, and they were about what I was expecting at around 1 1/2 inches at 10 yards. Not a target or hunting rifle by any means, but it wasn't meant to be either of those. It's a fun Plinker that looks like an M16.

This will be one of the few rifles I haven't torn apart. I couldn't find a reason to tear into this one.... 
Thanks for reading!


Thursday, August 22, 2013

Crosman 101 disassembly

Related Blogs:


The fun begins....


The front sight has a slight bend .... 
Handy for shooting around corners.  

Someone had been inside this airgun and adjusted the pump rod length. It had been adjusted out far enough that the pump was hitting the valve and the handle wouldn't close.

The rear sight is broken off. I will have to make a replacement.

There is a spring steel band to keep the pivot pin in its place. The holes don't show any signs of being worn or egg shaped.


Other than being dirty the pump cup is in good shape. The seal feels a bit hard but I hope it still has some life left in it.

The pivot pin has a bow in it, I'm sure this was caused by the pump linkage being misadjusted.

That is one long bolt that holds the stock to the receiver.

The steel butt plate was built to last not built for comfort.

With the cocking knob unscrewed the the bolt can be removed.


Removing the cocking knob gives access to the nut that holds the hammer spring in. 


With the nut removed the parts can be removed. The face of the tube that the cocking knob screws into also engages the trigger sear.

In this pic you can see the end of the exhaust valve. The cocking knob hits it to knock the valve open.

It's a bit blurry but at the bottom of the hole is another nut, it holds the exhaust valve in.

I made up this spanner to remove that nut.


A close up shot of the sealing surface on the exhaust valve.

The rest of the inner components of the valve.

A close up of the check valve.

The body of the valve is all that is left. It is stuck tight in the end of the pump tube. I used a wooden dowel and mallet to drive the valve body out of the tube from the pump end. I let it sit over night with Marvel Mystery Oil in the tube to help loosen things up. 

 Even after sitting over night the body wouldn't budge.... It took some heat from a propane torch and solid hits with the mallet to get it to break loose

The trigger was next. Removing the trigger guard let me remove the trigger spring.


The trigger pivots on this pin.

A pretty simple trigger but it works surprisingly well.

And here are all the bits and pieces....

Stay tuned for the repair and refinish Blogs....


Tuesday, August 20, 2013

Crosman 101 Project

I have been keeping an eye out for another Crosman 101, I wanted one in need of restoring / refinishing. The one I found is the perfect candidate. It is complete other than the broken off rear sight and at some point someone thought it was a good idea to spray paint it but didn't bother to mask off the wood on the pump handle.


The stock has been refinished (not very well) and has some fresh scratches. Once I get it sanded down I'll have to decide if I'm going to stain it or leave it blonde. 


There were four different logos used on the receivers of the 101s. this one has the "curved" logo.

The cocking knob dates this air gun to 1946-1950+ 

I'm looking forward to this rebuild and plan on taking my time and doing the best job I can restoring this fine old air gun.


Gamo Magnum Update

Since Parts don't seem to be available for this air gun I did some looking around and found a post some where out there on the InterWebNet listing the chamber diameters for a bunch of different air guns. The Gamo 1250 was listed as having a compression chamber size of 29mm, the same size as my Magnum. I ordered a piston seal for a Gamo 1250 but when it arrived it was not 29 mm, it was 1 inch or 25 mm. That seal will go into my parts stash. I made up an aluminum holder for an O ring to replace the seal. If it works I wont worry about replacing the piston seal. I have been looking and have found a few sources that have the correct size seals...
I finally finished up my rear spring guide and tried it out, the spring was coil bound just before the sear engaged. It took another trip to the lathe for some fine tuning but I'm calling it finished.
I assembled the parts for a test fire and after about 10 shots everything is looking good. I am going to tear it down again to check things out after I shoot a string over the Chrony. I want to make sure everything is working like it should.

A 10 shot group over the chrony and I have a base line. 10 RWS Meisterkugeln 8.2 grain pellets gave me an average of 667 fps, and a good group, 7 of the 10 pellets went into a nice small group. The FPS seems a bit low, I was expecting closer to 900 fps.


It appears that the O ring seal isn't working as well as I hoped, I'm going to try a few changes before I give up on it.  
Once I get it torn apart again I'll get more pictures and give more details so stay tuned.....

Tuesday, August 13, 2013

Gamo Magnum

 This should be an interesting project. There are a few missing parts, the rear spring guide being the most difficult. I have been looking but haven't found much information on the 1980's vintage Gamo rifles. I did find a parts manual online for a Gamo 900 that appears to be very similar. 
The thing that makes it a "Magnum" appears to be the ID of the compression tube, it measures at 1.145 inches or 29 mm. I measured for a spring and a .120" wire 31 coil will fit... seems a bit small for a magnum
(you can right click on the pics and open in a new tab to view a full sized pic)

There was no seal on the piston.

I found the old seal....in the bottom of the compression tube.

It took some work to get the old seal out, it was stuck tight, crumbling and came out in crumbs the consistency of crayons...
I'm not sure how it got in this condition.... I suspect there was heat involved and maybe some lube added to the compression chamber. Regardless, the tube looks good and should be fine.

It looks like a nice adjustable trigger.

The rear sight is decent, nice adjustments with crisp clicks. 

The wood looks good and the stippling on the pistol grip should help with getting a good grip.

There is a roll pin instead of a cocking shoe, this is the first time I've seen this set up. The blueing is worn in a couple spots on the cocking linkage but there is very little wear on the contact points, leading me to believe this air gun wasn't shot much.

I'm pretty impressed with the quality of the parts, everything seems to be well made. It should be a good shooter when I'm done. I'm working on a spring guide and a Gamo 1250 seal that I hope can be adapted to fit is on its way...