
Related blog:
Part 1
The first round on this build went well, I have a working air gun. Now it's time to work on the details and make this thing more comfortable to pump and stable to shoot.
Part 1
The first round on this build went well, I have a working air gun. Now it's time to work on the details and make this thing more comfortable to pump and stable to shoot.
I'll add some weight to the stock and a pump handle will give me a more stable rest along with making it much easier to pump.

I had a mystery stock in my stash of goodies, I had used it as a temporary stock on a previous build.
A trip to the band saw and I have the basic shape of my filler block.
A trip to the band saw and I have the basic shape of my filler block.

Some work with an orbital sander and the block is a nice snug fit in the 1399 stock.

My pump handle is 2 pieces of Oak separated by a 1/4" thick piece of Poplar.

After adding some shape to it, I think it looks pretty good.

I finally found a use for these Industry Brand pellets.

I filled a cavity in the butt of the stock with the pellets and epoxy. During some testing it was a bit muzzle heavy, this will help balance things out.

Some dark walnut stain and shellac and the wood is sealed up.

Painting the pump tube will have to wait for warmer weather, I'll finish this up in the spring.

I built a new piston to replace the one I robbed from my .22 cal build.


The plug for the end of the pump tube and a barrel band.

Once I got the rifle reassembled I did some shooting and noticed it wasn't grouping as well as I was expecting.
I thought I'd try some different pellets to see if one stood out as a good pellet, No joy....

I tried a few different things to see how they affected accuracy. The 953 liked the RWS Meisterkugeln pellets so I used them for my first tests, 5 shot groups with a floating barrel, the barrel band installed then with the barrel band on I added the barrel weight from a Daisy 853. The best group was with the barrel band and weight installed shooting at 4 pumps. I saw a few encouraging groups but this thing was throwing fliers about every 5th or 6th shot.

Then I remembered a problem I had seen before with the Crosman steel breech. pellets don't always make it past the transfer port, I pulled the barrel and breech to check for this problem.
Sure enough about 1/3 of the transfer port was blocked by the skirt of the pellet. The skirt can collapse when the air from the valve hits it causing problems with accuracy.

My first attempt to solve this problem was to build a bolt with an extended probe. This got the skirt past the transfer port but created another issue. The pellet wobbled on the probe and wasn't going into the breech straight, this caused the pellet to be deformed as it was pushed into the barrel at an angle. I could feel this happen as I slid the bolt forward, the same thing was happening with the Crosman bolt but not as bad.

My cure for this problem was to build a bolt with a hollow probe. The hollow probe pushes on the edge of the skirt, keeping the pellet straight as it is pushed into the barrel. The other bonus of this design is it doesn't matter how deep the skirt is, the pellet is always pushed past the transfer port.

I saw a big improvement in groups, two ten shot groups and no fliers. It doesn't like CPHP....

Two 10 shot groups over the Chrony with 7.0 grain RWS Meisterkugeln pellets. 
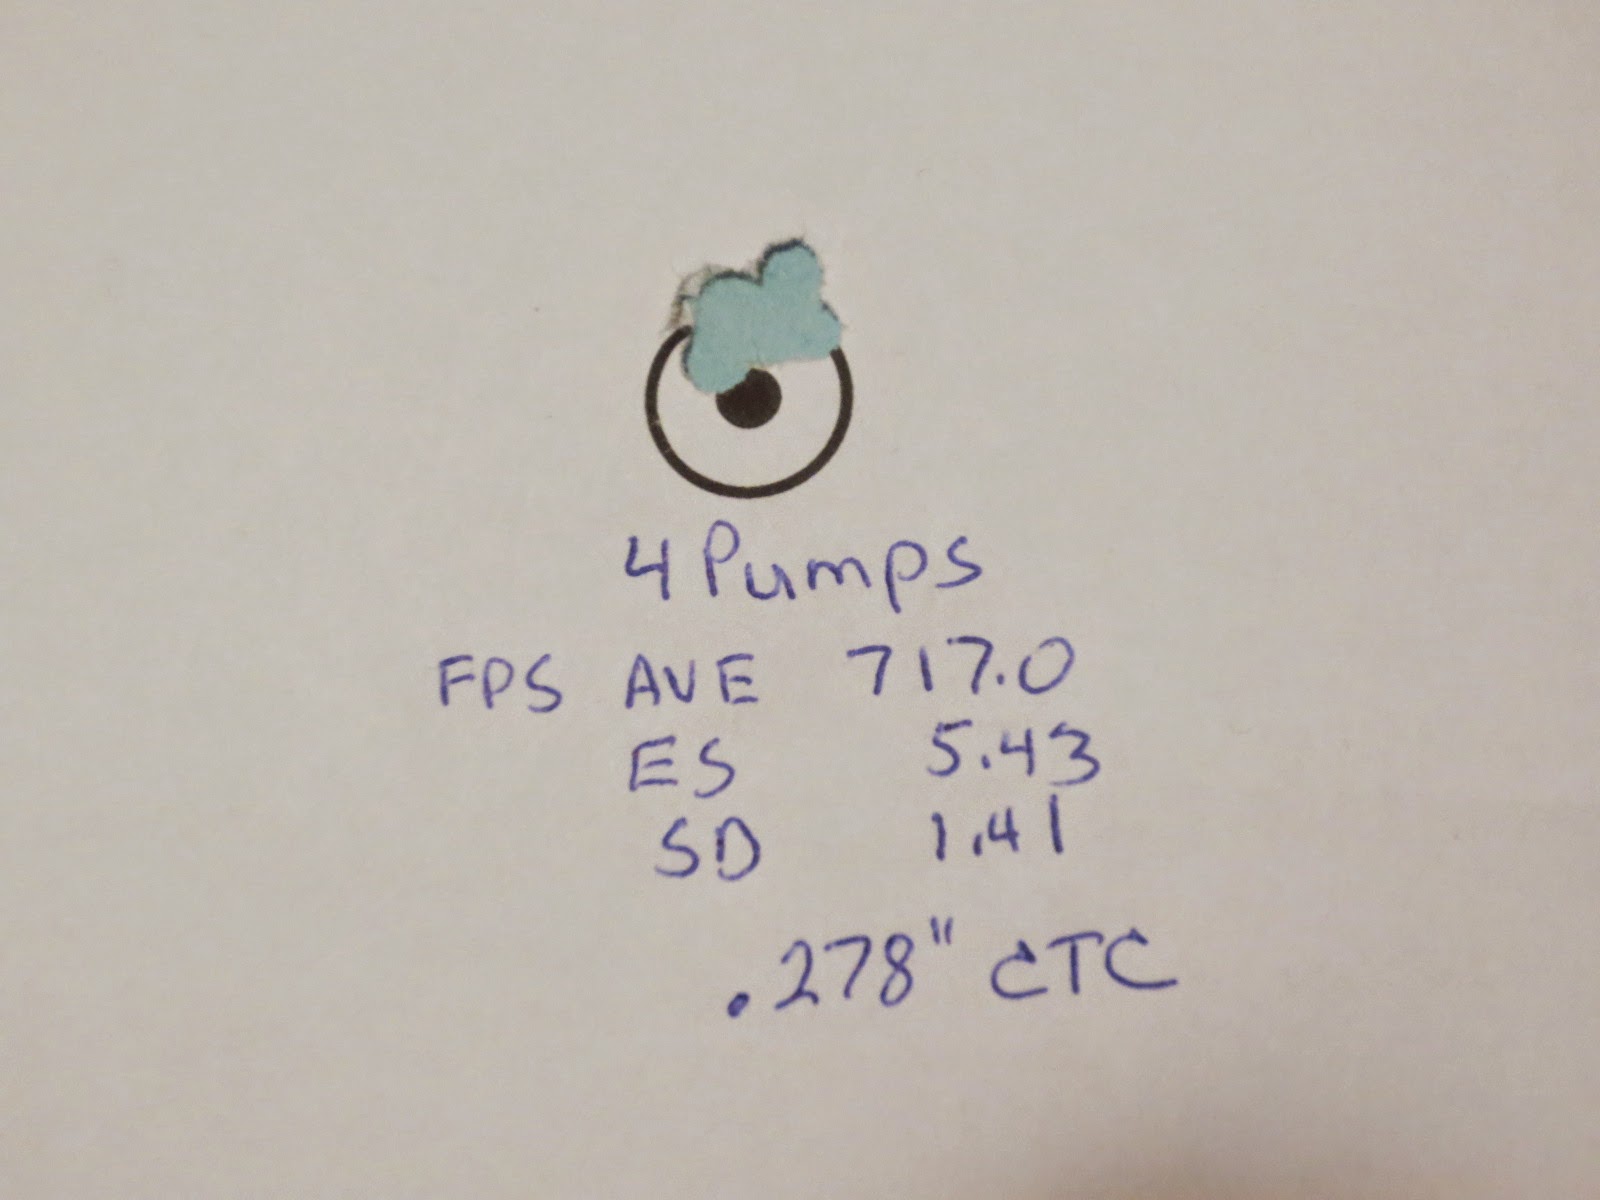
While shooting over the Chrony this thing was showing its potential. 717 fps at 4 pumps! 5 pumps gives just under 800 fps and the valve starts retaining air. With some work I think 10 pumps would put out close to 1000 fps. I'm more than happy with 800 fps at 6 pumps so I'm not going to try for 1000 fps.
UPDATE:
I wanted to do some work to the pump linkage to see if I could make it better. During the testing the brass bushing at the muzzle end of the linkage started to fail, the split pin was chewing up the bushing. I made up a new bushing and turned up a new pin from drill rod. I was surprised at how much smoother the pumping was with the new pin. This got me to thinking, would replacing the bushings with bearings make it even smoother? A quick search online found bearings that would fit. (R166-ZZ) 3/16"X 3/8"X 1/8"

The muzzle end of the linkage is 1/4" thick so it will take two bearings, the piston end is 1/8" thick so it will get one bearing. There isn't enough metal to fit a bearing in the middle so it will stay a bushing.

The bushing is 1/4" OD so I will have to bore the linkage out to 3/8" for the bearing to fit.

The bore wasn't as tight a fit as I wanted so I staked the edge of the hole with a center punch.

I checked the pump force before changing to bearings, at 6 pumps it took 29 lbs to pump the rifle. With the bearings installed it took two lbs less force to pump it. While trying out the new mod I noticed a ping noise while pumping then the pump linkage started falling away from the pump tube after firing. A quick check and I found some play in the linkage at the piston end of the linkage. When I took the linkage apart the bearing came apart.

Hoping the bearing was bad when I installed it I replaced the bearing with a fresh one and tried again, but got the same results. These bearings just aren't going to take the forces that the pump linkage generates. So it is back to brass bushings. I turned some new bushings to match the OD of the bearings.

I'm happy with the way the linkage ended up.

It's back in shooting form again and I have learned something new.
Thanks for following along.
Awesome! thank you for the post.
ReplyDeleteThis is so very inspiring. Something that I want to do with my C1377
ReplyDeleteGlad to help feed the addiction! Due to moving I haven't been into airguns for a couple years now but this was one of my most satisfying projects. I'm glad to see my little blog still gets some views.
DeleteLuv it! Tell me, the brass tube: what is it? where can i find it?
DeleteThanks! I bought the brass tube online, I don't remember where. Just Google DOM brass tube and you will find a supplier. The tube I bought was slightly thicker walled than the Crosman tube making the exhaust valve a tight fit. I ended up cutting the O ring groove in the valve deeper so the O ring wouldn't get cut when I installed the valve. I made my own piston so I made it to fit the smaller I.D. of the brass tube.
Deletethanks! why a brass tube and not steel, etc? i've always thought brass too weak for such applications?
Delete(sorry if i'm being an info-pest... but i must know these things!)
I got the idea for using brass from the old Crosman 100 series pumpers, they had brass pump tubes. Brass is easier to machine than steel and no worries about rust. I did use steel tube on one of my other projects with no issues though. I was a little concerned about strength but I checked specs before I started. I don't remember what the specs were but it was well with in the safety margins for burst pressure.
Deletewhere do you find the specs for a given tube size, thickness, metal type, etc?
Deletetoo bad about the bearings! although, not only do the the brass bushings seem more than adequate, they look sharp, too. i'm guessing they're meant to be replaceable as they wear out?
ps-not sure if it's possible with those tiny bearing assemblies (or if it would even solve the problem as it appears the bearing failed laterally...?) but back in my bike mechanic days i used to routinely remove the "cage" holding the ball bearings which allowed several more bearings to be added to increase the actual bearing surface. (that's a lot of bearings for one sentence.)
I found specs at the Online Metal Store under a link called "Guide to Brass" The tensile strength for 330 brass is 65,300 psi. Using Barlows Formula for 3/4" tube with a .065 wall (that's what I used) and a safety factor of 3, I came up with a working pressure of 3772 psi. I don't think you would reach 3700 psi with this style of pump, that combined with the safety factor of 3 makes me feel safe. I encourage you to do your own calculations though. I'm not an engineer but Google was a big help figuring this stuff out.
DeleteThe bearings I tried didn't reduce the pump force by much even before they gave out. It was something that sounded good but didn't work out. I think the brass bushing is the way to go.
thanks for the Online Metals tip. there's quite a lot of info there.
Deletehad to pull myself away when i found myself wandering through the specific gravities of various plastics...
thanks again for the info & good luck with future projects.
Ahh yes, I have been caught up in the vortex of information that can be found on the internet. Between the forums, web sights and You Tube I have lost countless hours to the web.
DeleteThanks for reading my blog.
This comment has been removed by a blog administrator.
ReplyDelete