Friday, June 28, 2013

Reassembling the Crosman 707

With everything cleaned up and checked out it is time to put the 707 back together. First up is putting the barrel back in and aligning all the holes. The bushing is a slip fit on the barrel and helps hold the barrel centered in the tube.

This bushing sitting on top of the tube is for the tap detent it also helps hold the barrel in place.


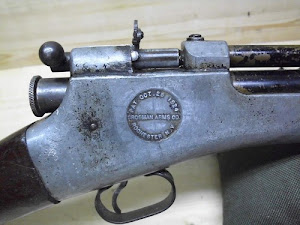
 With the barrel held in place by the detent bushing I installed the hammer/ transfer port, spring and bolt handle. The L shaped slot in the tube is for the bolt handle, the bolt is also the safety. With the bolt cocked it can be rotated up locking the bolt in the cocked position and the gun wont fire until the bolt handle is rotated down.

 Here the tap, detent ball and spring and knob are laid out and ready to be installed.

 With the tap installed I was ready to install the valve. The bolt at the top serves two purposes it locates the barrel in the tube and also locates the stock in the proper spot. 
I used a socket slightly smaller in diameter than the valve and a wooden dowel to push the valve with its new O-ring into position. It was a bit tricky getting the transfer port to slip inside the valve and the threaded hole in the valve needs to be aligned with the hole in the tube for the screw to lock it in place.

A close up of the low tech mount, AKA a hose clamp. The front clamp also compresses the tube around the bushing that aligns the barrel with the tube.

I slipped the mounting clamps over the tube and laid the whole assembly in the stock. Two screws mount this assembly to the stock, the rear screw in the trigger guard and a screw in the fore stock.   

The final pieces, front and rear sights along with the piercing cap were installed. I put in a CO2 cartridge to check for leaks and it's holding gas!

No "Soda straw" barrel on this shooter, the OD on this solid barrel is 1/2".

Once I was sure it was going to hold gas I shot a ten shot group with RWS Hobby pellets to foul the freshly scrubbed bore.
The top bullseye are the last 25 shots I fired before the tear down. The bottom bullseye are the first ten shots  after the reassembly. 

I switched to one of my favorite pellets, RWS Meisterkugeln  in 7 grain to get the rifle sighted in again. Once it was sighted in I took my time and shot this 10 shot group. Things are looking good! 10 shots inside a dime at ten yards. I finished off the CO2 cartridge after shooting this target and got another ten shots for a total of 40 shots from a 12 gram cartridge.

I am very pleased with this shooter, it is as accurate as I was hoping for. I really like how easy it is to load pellets, no fumbling around to get the pellets into the breech on this air gun.
I don't think it shows in the pictures but there is quite a bit of rust pitting on the tube and barrel, I may tear it down later and remove the pitting and reblue all the metal. It would be a good winter project...


Thursday, June 27, 2013

Crosman 707 trigger

There is nothing fancy or complicated about this trigger. The trigger / sear is stamped out of a piece of metal and a pin through the stock for it to pivot on and a spring to push the sear up. 

I've seen this same setup used on the early Crosman 160, I'm sure they used it on other models too.

After pressing out the pin I found there was quite a bit of rust to remove from the trigger and pin...

I cleaned it up and touched up the blueing. It's all lubed up and reinstalled, hopefully the trigger pull will be lighter now. 

Tuesday, June 25, 2013

Crosman 707 disassembled

I fully intended to shoot the 707 for a while before I tore it apart. That didn't happen.....

I shot the rest of the CO2 in the cartridge that was in it, then reduced the 707 to its greatest number of parts. One of the reasons for the tear down was that I wanted to clean the barrel. It is hard to clean the barrel on a tap loader. Before I tore it down I tried to run a patch through the barrel with a cleaning rod. I thought the patch would stay on the jag and I could pull it out. That wasn't the case, the patch came off the jag and stayed in the tap. Luckily I was able to fire the gun and shoot the patch out. 
I'm glad I tore it down, it was pretty dirty inside.

The end of the valve had a heavy coat of rust on it.

The inside of the tube was dirty and rusty also, a couple passes with a shop towel soaked with Marvel Mystery oil and the tube is looking much better.

I was curious about how the valve worked. To cock the rifle you push the bolt forward, when fired the bolt moves to the rear.... The opposite of the way all my pumpers and CO2 rifles work.
The mystery was solved once I opened it up. The valve sits behind and in line with the barrel. The transfer port is also the hammer to open the valve. When you cock the gun the hammer spring is compressed, when the sear releases the hammer it slides rearward into the valve, opening the valve and allowing a charge of CO2 to travel through the transfer port/ hammer into the tap and push the pellet down the barrel. Pretty cool! I have been trying to figure out how to make an inline valve for my next build, now I have some ideas.


In case it isn't clear in the pictures above, the transfer port/ hammer is hollow. The end that goes into the valve is pointed and has three holes drilled in it to allow the gas to travel through it.

The valve is pretty simple inside, a screen and washers, with a spring to hold the valve against its seat, all held in with a snap ring.


Crosman 707

My latest score arrived today. The Crosman 707 was made from 1967 to 1971. It is a CO2 powered tap loader. It was meant to be an entry level target rifle, I think it might have been more popular if it had come with a better stock. The slab style stock reminds me more of an early wood stocked Daisy BB gun than a target rifle.
It is showing promise, it arrived with a CO2 cartridge in it and it is holding gas. I fired a couple 5 shot groups with it to make sure it is functioning as it should. It put 5 pellets inside a dime at 10 yards from a rest with open sights. I'm pretty impressed so far.


Even though everything is working on the 707 I plan on tearing it down so I can inspect everything. I'm hoping the trigger can be improved, the pull feels a bit heavy.

Sunday, June 23, 2013

The first step is admitting you have a problem.

I was going to title this Blog "What I look for when purchasing an air gun" when I reread it I decided to change the title.

The delivery of my Crosman 707 has been delayed until Monday. I have been thinking about why I purchase the type of  air guns that I do....
I did a mental count of the air guns I have purchased brand new in the box, that count is seven air guns since 2009. Make that 8 I forgot the QB57. That works out to 2 air guns a year. Four of those were purchased in the first year of this addiction, so that means I only purchase 1 new air gun a year. Right? It sounds a little better that way.
The other air guns I have owned were found at pawn shops, second hand stores and online auctions. I wont even try to count them, thanks to a box of 20 air guns purchased from an online auction that number is close to 40 used air guns. Probably actually closer to 50..... The first step is admitting you are an addict.
While I enjoy the unboxing of a brand new shooter as much as anyone I get much more enjoyment from purchasing  an old wood and metal shooter in need of some attention and bringing it back to life. I have been lucky and have been happy with most every "project" I have purchased. Every few months I take stock of my inventory of shooters and sell the finished projects that no longer interest me. I don't like having air guns sitting unused, if I am not going to shoot them I think they should go to a new home where they will be enjoyed. I rarely make money on these sales, if I break even I am happy. There are a couple exceptions I did find a Crosman Mark 1 pistol at an estate sale for $30 and It sold for double what I paid for it. Then there was the like new Benjamin 397 I found in a pawn shop for $40. I ended up trading that 397 for an old break barrel that is worth $40. I didn't think that trade through, but I did have a lot fun with that break barrel.
 A couple times a month I will stop in the local pawn shops and second hand stores, if they have anything it has to be the right price. The Antique shops seem to think that every Daisy BB gun made is worth $90???
My favorite place to find projects is online auctions, when I feel the need to start a new project I will search the auction listings. I normally just look through the listings until I see something that piques my interest, I bought a side lever springer because it was $40 and I had never owned a side lever before. That is what happened with my Crosman 707 purchase, it is a tap loader and I have never owned a tap loader before, (and it went cheap).
I rarely have an air gun in mind when I go in search of a project. There are two exceptions, my Crosman 101 and Daisy 853. I went searching for those air guns.  Normally I am an impulse buyer, I just look until I find something interesting.....
That is enough of my rambling for today.

Sunday, June 16, 2013

Making the Benjamin Discovery quieter, Update.

I have decided to put the Disco moderator on the back burner for now. While it does quiet the report, it is affecting the rifles accuracy to the extent that I have no interest in shooting with it on. Thinking that the pellets were clipping the baffles I enlarged the holes in them from .188" to .200" with no change. I the opened them up to .210" and still no change. I stopped at this point mostly due to frustration.
This past week I won a Crosman 707 in an online auction and I am looking forward to having another project to tear into. I hope to have the 707 by next weekend so that I can start a write up about it.

Sunday, June 2, 2013

Thanks!

I wanted to say thanks to everyone who has viewed my little Blog. I just passed 1000 views. This is a hilariously small number of views in the world of the Interwebnet but in my little world it is much more than I expected to have in under two months.
Thanks everyone and I look forward adding posts and hopefully some useful information in the future.  

Saturday, June 1, 2013

Making the Benjamin Discovery quieter, Part 1

I don't really have a problem with how loud the Disco is, but lets face it building a silencer/moderator is just cool. I did some research and found a few Web sites that covered the basics of how a silencer works. My first attempt was simply a 3/4" OD tube with a piece of round stock turned down to fit the ID of the tube. I center drilled the round stock on the lathe to 1/4" for the pellet to pass through. Then cross drilled the round stock with a 1/2" drill bit to create chambers to give the air a place to expand and slow down before it left the end of the silencer.


It worked, not great but it did quiet down the report. It worked better on the .22 cal pumper that I tried it on than on the .177 call Disco. This prototype silencer was built while I was waiting for my replacement Disco to arrive. The only other air gun I had that was "loud" was my Experimental .22 cal pumper, so I built it for that air gun.

My next attempt at building a moderator used the "K" style baffles, the baffles ended up being more of an X than a K but the results were very good. The baffles were center drilled to 3/16" for a closer fit to the .177 cal pellet. I have talked to people who have used washers instead of "K" baffles with good results but the "K" baffles look so much cooler..... not that you can see them once they are inside the moderator but they look cooler so they have to work better. Right? I'm not going to go into great detail on building the moderator but here are some pics.


For this video the target is set up 30 feet from my bench and the camera is a couple feet from the target. I pumped up the Disco to 1800 PSI since shooting on HPA is louder than CO2. The first three shots are without the moderator, the last three are with the moderator. Quite a difference.

As you can see in the video the shots with the moderator installed hit to the right of the POA. Once the video  was done I opened up the silencer and sure enough the pellets were hitting the baffles. 3/16" is a bit of a tight fit for the pellets. I'll have to open up the holes another .010" and see how that works. Being quiet is great but if it won't hit what I'm aiming at the moderator is of no use to me.

Stay tuned for part 2.....